The Best of the Joy of Painting with Bob Ross
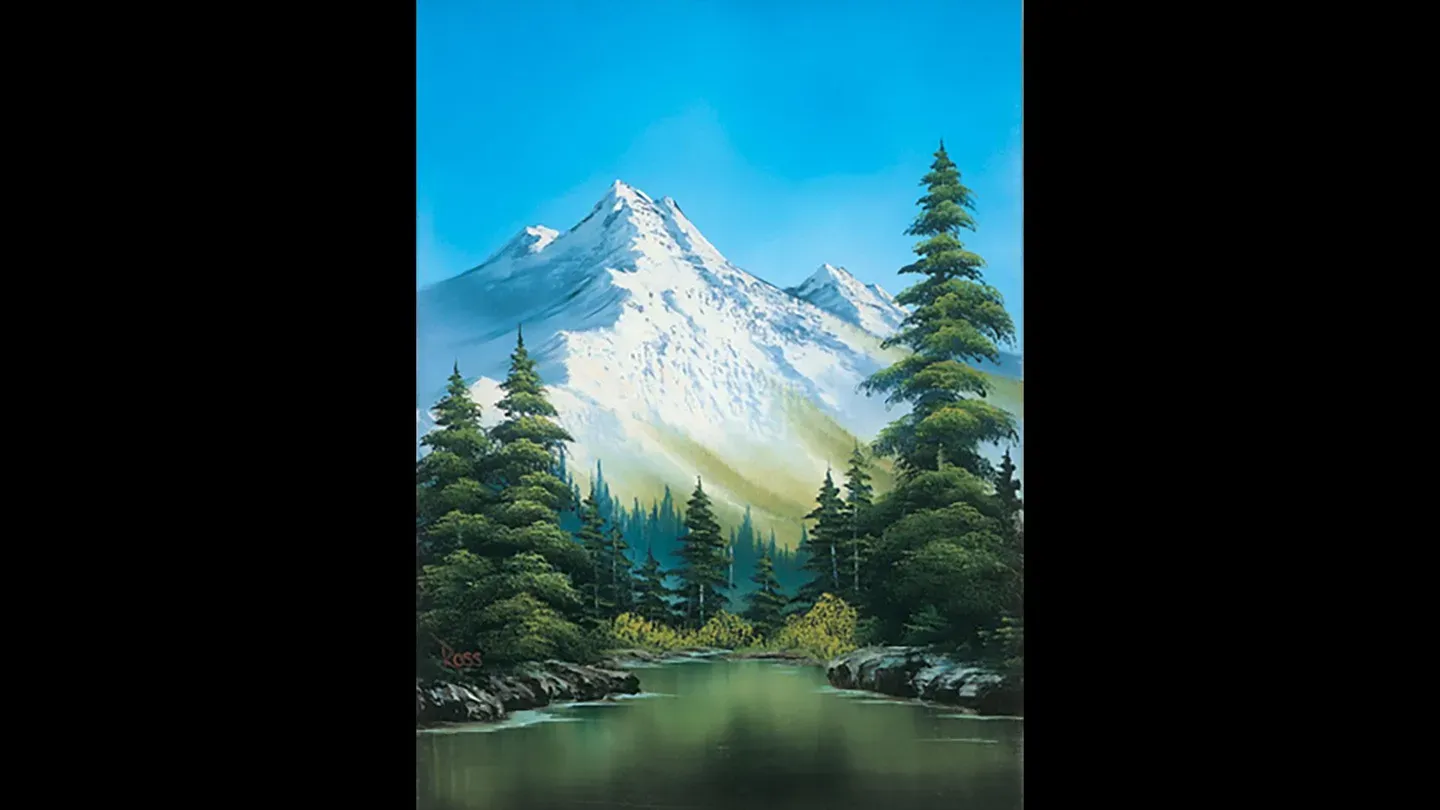
Valley View
Season 41 Episode 4114 | 27m 1sVideo has Closed Captions
Bob Ross creates a masterpiece so tranquil you'll want to paint along.
This beautiful valley lake will leave you fully rested and at peace with the world! Bob Ross creates a masterpiece so tranquil you'll want to paint along.
Problems with Closed Captions? Closed Captioning Feedback
Problems with Closed Captions? Closed Captioning Feedback
Distributed nationally by American Public Television
The Best of the Joy of Painting with Bob Ross
Valley View
Season 41 Episode 4114 | 27m 1sVideo has Closed Captions
This beautiful valley lake will leave you fully rested and at peace with the world! Bob Ross creates a masterpiece so tranquil you'll want to paint along.
Problems with Closed Captions? Closed Captioning Feedback
How to Watch The Best of the Joy of Painting with Bob Ross
The Best of the Joy of Painting with Bob Ross is available to stream on pbs.org and the free PBS App, available on iPhone, Apple TV, Android TV, Android smartphones, Amazon Fire TV, Amazon Fire Tablet, Roku, Samsung Smart TV, and Vizio.
Providing Support for PBS.org
Learn Moreabout PBS online sponsorship[Music] Hello, I'm Bob Ross and I'd like to welcome you to the 21st Joy of Painting series.
If this is your first time with us, let me extend a personal invitation for you to drag out your little paint brushes and some paints and paint along with us each show.
Or just drag up the old easy chair and enjoy a relaxing half hour as we place some of nature's masterpieces on canvas.
And for those of you've been with us for a while, thank you very, very much for inviting us back for another series of painting shows.
Tell you what, let's get right to it.
Let's start today and have them run all the colors across the screen that you need to paint along with me.
And while they're doing that, come on up here and let me show you what I've already done.
Have my standard old 18 by 24 inch canvas, but you use any size that's convenient for you.
We just use this because it sort of fits the television screen.
The bottom of it I have covered with a little bit of black gesso.
And you can put it on with a sponge or a foam brush or just a paper towel.
It doesn't matter, anything to cover it and then let that dry.
Then we've applied some transparent color down here on the bottom of this.
And today I've used a little sap green and Van Dyke brown mixed together.
And it's still wet.
The black gesso has dried but the transparent color on top here is still wet.
Okay, and then the top we've just covered with a little bit of liquid white, and it just makes the canvas nice and wet and slick and it allows us to actually blend color on the canvas rather than working ourself to death on the palette.
So I tell you what, let's just take off and have some fun today.
Let's start with this little two inch brush here and we'll go right into a small amount of the phthalo blue.
And all we do is just pull a little bit out and then tap it into the bristles.
By tapping, and turn the brush over, tap both sides.
See that assures a nice even distribution of color all the way through the bristles and that's what we're looking for.
And it's easy to add more color, but it's a son of a gun to take it away.
So start with a little bit of color and you can always add more if you need it.
We'll go right up to the top of the canvas and we'll start, we'll just do some little Xs, little criss cross strokes.
And we'll work all the way across the top.
Now the color is continually mixing with the liquid white.
And it creates all those beautiful variations that we want.
Let me put a little more color on the brush here.
There we go.
But start at the top and work down.
And that way our sky will get progressively lighter toward the horizon.
And that's exactly what we're looking for.
In a landscape you want things to get lighter toward the horizon and darker as they come away from the horizon.
So by using the liquid white and allowing the color to blend, that effect happens automatically.
You really don't have to worry about it, it just happens.
And that truly is the joy of painting.
There, and we'll just work this right on down.
I thought today we'd start this series with just a very basic little painting.
And if you've painted with us before this'll be an easy one for you.
If this is your first time, then you can see one of the ways this fantastic technique works.
Okay, now we just take and very gently go across the entire sky.
And this just removes the brush strokes.
That's all we're doing.
Okay, and that simple, we have a happy little sky.
And that's all you have to do to make a very, very basic little sky.
Now let's build us a little mountain.
I like the mountains.
We'll take some black, a little Prussian blue, some alizarin crimson and we'll just mix those together.
I'd even put a little Van Dyke brown in there, just to dull it down some.
Pull the color out as flat as you can get it and go straight down with the knife, cut across so you have a little roll of paint.
And that little roll of paint should live right out on the edge of your knife, right out on the edge of the blade.
Now then we have to make our first major decision in this painting.
Where does our mountain live?
And I think in my world it's going to live maybe right there.
It is now anyway.
All we're doing here is just pushing that color right into the fabric, right into the canvas.
And this is pre-stretched canvas, we do not recommend the canvas boards because they have the tendency to absorb the liquid white and you end up with a dry surface almost immediately.
Maybe, maybe here, yeah, right there.
We'll have another little bump there.
Just wherever you want them.
And painting is a very individual, everybody will see nature through different eyes and everybody has their own idea of what a mountain should look like or a tree.
All we want to do here is show you how to make these effects.
What you paint is totally up to you.
We just want to show you how to paint.
Just to get you, just to get you started.
There, now using a big brush and very firm pressure, I want to pull this down.
The only thing we're worried about right now is this nice outside edge.
We could care less what's happening in here.
But once again, because we have the liquid white on the canvas, the color is blending with that and as you can plainly see automatically as it goes down it gets lighter and lighter in value.
And once again, that will happen automatically when you have the liquid white on the canvas.
And it's just an oil base, white paint that allows you to do all this.
But you can just blend it right on down and already that mountain looks like it's almost sitting out there in the mist.
I tell you what, let's wash the old brush.
That's the fun part of this.
That's the fun part.
Shake off the excess and just, [chuckling] just beat the devil out of it.
As I say, that's the part that's the most fun.
There we go.
Let's take, let's take some titanium white today.
And we'll reach up here and I'll get a very small amount of the dark sienna.
Don't want much, just a little dark sienna.
A little bit, maybe I'll even put a touch of the bright red in there.
Oh that's nice.
I just want to flavor this a little.
Just enough to flavor it a little bit.
Now when you do yours, you make the determination how much you want.
Let me wipe the knife here.
And we just wipe our knife on a clean paper towel.
Then we can cut off our little roll of paint again, so it's right on the edge of the knife.
And let's go up in here, no pressure, no pressure, touch.
And let that knife just float, let it float, let it float right down the side of the mountain.
Think about where light would strike.
Okay let's go right in here.
[Bob makes "soom" sound] got to make those little noises or it doesn't work right.
There.
Just pull.
See there how easy that is though?
And you can change it to any color that you want it, any color that you want it.
Sometimes I like to do this with a grey color and it looks like stones and rocks and, depends on where you live.
Maybe, maybe in your world you don't want a mountain.
Then you can paint this scene and it'll be very beautiful without a mountain.
It's up to you.
It's really up to you.
As we mentioned earlier, painting is, is as individual as people are.
There.
Now then, we have to start thinking about little things maybe, in my world, I think there's a little light going to strike right there.
So we'll put a little touch of light there.
I'm going to take some white, we'll use a little bit of that mountain color with it.
And a little bit of phthalo blue with it, what the heck.
Maybe a little more blue there.
And with that we'll make us a nice shadow color.
Now this shadow color should be lighter than the base color that you put on your mountain.
But certainly darker than your highlights.
So somewhere in between.
You have to, you have to reach a happy medium.
Once again our little of paint, okay?
Let's go up here.
Now if this one's going to be the farthest away, we'll do this little rascal first, put a little bit of shadow right there.
All there is to it.
Now watch, watch.
Come distinctly through and look how it pushed that little devil back.
Bet you didn't realize you had that much power.
But on this piece of canvas you have total and complete power here.
You can do anything that you want to do.
You can move mountains, rivers, trees.
You can determine what your world is like.
There's tremendous amount of freedom on this canvas.
And that's what makes it fun.
That's what makes it fun.
Now then, and you can come back in here, see this line is very straight.
Now we can come back in here and we can put all kinds of little ridges and bumps and little places where the mountain goat would have to live up here.
He's got to have a little home too.
And we'll just let that run right on down.
Okay, but each one of these little projections needs a little shadow.
Needs a little shadow or it just won't play.
It'll go hide.
See how that little shadow just brought it right out?
Watch though, maybe, maybe it goes right over here.
I don't know.
Don't know, it's up to you.
You have to make these big decisions.
There.
But notice, notice the angles here.
All the highlights are going in one basic angle.
All the shadows are going in one basic angle.
They vary a little, but overall, overall they're going in the same angle.
Because if light's coming through here, it's only going to strike on a given angle.
Now with a good clean, dry brush we can tap the base of this a little and create the indication of mist that lives right down at the bottom of this big ole mountain here.
Lift gently upward, upward, following the angles in the mountain.
And that removes the little tap marks and brings it all together.
Over here go in this direction.
Tap a little and blend.
There.
Alright, now maybe we'll get a little crazy today.
I like to do that.
Let's take, I'll use a little of the mountain color and we'll go right into some yellow, I got a little cad yellow here, a little yellow ochre, we'll just use the same old two inch brush.
Doesn't matter, maybe a little touch of the sap green here and there.
Maybe in our world there lives some little trees that sort of grow right up the side of this mountain.
And to do that all you have to do is take the big brush and tap, but most, most important here, we need to follow these angles.
Need to follow these angles.
If you don't, it just absolutely won't look right.
Vary the colors between darker green and lighter green.
Back and forth a little.
Just a little, maybe sort of determine where you think a little tree would live right here.
And how far up the mountain it would grow before you reach the tree line.
Or, the place where it gets too cold and too high for trees to live.
There.
If you've painted with me before you know I lived in Alaska for, well over a dozen years.
And I just absolutely fell in love with the fantastic scenery that's there.
God was having a good day when He made Alaska.
It is gorgeous, absolutely gorgeous.
There we go.
But these kind of sights are pretty common there.
Now we'll take a clean, dry one inch brush and very lightly, little short strokes.
I want to grab that and lift upward.
Just lift it upward, upward, upward.
And sort of let it blend together a little.
And you just sort of work back and forth here.
But gently, gently lifting upward.
Always going upward.
Think about the little trees, even though they're going at an angle here, they would still grow straight up.
So keep these lines going straight up.
Sometimes the tendency, the mountain go this way to make your trees like that.
And it'll look like the big giant sneezed or something and blew them all over.
We don't want that.
And you can even touch a little dark color here and there.
And just pull up the indication of some that are a little darker.
You can continually play this back and forth between the darker greens and lighter greens.
And it's a nice way of making very effective little trees that are growing up the side of this mountain.
There.
Okay, shoot that's so much fun.
I tell you what, wash the old brush again.
I just look for reasons to wash the brush.
[chuckles] Alright, we're in business again here.
Let's take, let's get crazy.
Let's have some fun.
We'll take some Prussian blue, some Van Dyke brown, some midnight black, maybe even a little sap green.
We'll just mix all those together.
Just mix them together, make a, make a big old pile of dark color here.
It should look black, should look black.
Okay, now then, tell you what, let me wipe the old knife off.
Fact, we'll get a, let's get a fan brush.
Shoot, that's fun.
I'm going to load the fan brush full of this dark color, both sides, a lot of color.
Let's go right up in here.
Maybe in our world there's a little, maybe there's a little foothill that lives right here.
Tell you what I'm going to do, I'm going to add a little, a little bit of white to that, I want to lighten it just a little, oh that's much better.
Went a little bit lighter.
There.
But there's some little footy hills that live right here.
Some evergreen trees are growing on it.
And they're much closer to us.
Much closer to us.
So they're darker, they're much darker than this background back here.
Just tap them down with the fan brush.
This is one of the neatest ways that I've ever come up with of making the illusion of a lot of little trees that live far away.
There we go.
And you determine how many and where and all that.
There we go.
Now then, we can take a clean, dry two inch brush and I'm just going to tap the base here a little.
I want to create a little bit of mist at the bottom of these trees.
And this tapping will cause the liquid white to come through.
And a little bit of that color will show.
Lift upward, just to take out the tap marks and bring it all together.
See there?
There we go, there we are.
Now then.
Maybe, maybe in our world, we'll just use that same old fan brush, it's working so well here, let's keep going.
Load a lot of the pure dark color on it.
Let's go right up here.
Maybe there lives a happy little evergreen tree right there.
We just use the corner of the brush.
And just go back and forth, see there.
That easy.
And let's give him a few friends.
We don't want him to get lonely back here.
My gosh, with a scene like he's got to look at here, he'd have to invite all of his friends over to see it too.
This is just, this is just too nice for him to keep for himself.
There's a little one.
Put the little guy right up here in the front row so he can see all of this too maybe.
There we go.
There we go.
Notice how these little misty areas make those trees really stand out.
That's why they're so important.
That's your separator, that's your good friend.
That's your good friend, take care of it.
Take care of it.
And you put as many or as few as you want in your world.
One thing that we're trying to do here, is just to teach you a method.
We're really not trying to teach you to copy.
That's the reason we have no patterns or we don't do any tracings on the canvas.
We want to teach you freedom with this technique and turn you loose on the world.
Just absolutely turn you loose on the world.
Because once you know the technique, you can do anything.
Take a little blue, a little tiny bit of blue and white and a little bit of the dark sienna.
Pull it out flat and we'll get a least little roll of paint right out here on the edge of the knife.
And let's just make the indication here and there of a little tree trunk.
Right in there.
All right, we don't want many, because you wouldn't see all of them.
Oh you're just going to see a little here and there.
And you can just, because you've picked up some paint on your knife you can just make the indication of some little sticks and twigs and all kinds of things that are just projecting out of that.
Because in the woods, in the forest, they're always there.
Now then, I have several fan brushes going.
Let me just grab another one here.
Let's put some highlights on that.
We'll take a little, little bit of the color we made the trees out of, because it has blue in it and mix it with some cad yellow and a little yellow ochre and a little Indian yellow, what the heck.
And we'll make us a nice green.
If you want it darker, add a little more of that tree color to it and instantly, because it has blue and black in it, see, it gets darker.
That easy.
Let the paint work for you.
Let's go up here.
Now then our light's coming from the right because our mountain tells us that so we want to place more emphasis on the right side of the tree than on the left.
And we'll just put the indication of some highlights that are showing through on these trees.
Now sometimes, sometimes this gets feeling good.
And you cover up all the dark.
We don't want to do that.
If we lose all that nice dark then our tree becomes flat.
It's that darkness that's deep in the tree that creates the illusion of shadows and makes depth in the tree.
Otherwise it'll be a very flat, little tree.
[chuckles] We don't want that, we don't want them flat trees.
We want trees that, son of a guns have personalities.
They're like people, each one's different.
Some are tall, some are short.
Some are heavy, some are thin.
They're like people.
And this painting can really and truly become a world on its own.
You can find anything that you want in here.
You can find peace, you can find calm times, anything.
It's right here.
Shoot, let me get off my soap box here and find a brush and let's get crazy.
Let's make a, let's make a big evergreen right there.
And for that, I'm going to, tell you what, I'm going to pick up the old oval brush here.
We'll go right into that same tree color.
Now this is the oval brush.
The end of it, let me hold it up here so you can see.
The end of it's sorta round.
And it's easy to distinguish, because it has a black handle.
And the rest of them have white handles.
Easy to tell the difference.
Okay, pull it like that until it comes to a nice, sharp edge.
Let's go up here.
Make a decision.
Maybe our big tree, we're going to have one that's going to live right there.
We start out by just making a little line.
That sort of gives you a guide.
Take just the end of the brush.
Now this is going to be one of them big evergreen trees that is sort of saggy.
The limbs hang over.
I like this brush for making these kind of trees.
See how the limbs hang.
Oh, I like that.
But you can do this with a one inch brush and have straight limbs.
You can do it with a fan brush.
I use a fan brush very often.
Or you can do it with a two inch brush.
It all works very well, but if you want these hangy down looking limbs like this, I find it much better to use this oval brush.
There.
Now then all we're doing here is just placing in some very basic little shapes.
Just think about the arms on this tree that live out here.
Where you want them.
There.
Maybe this old tree lives, I don't know, somewhere down in here, we don't care.
I don't know, that was fun.
[chuckles] I like making trees with that oval brush.
I tell you what, let's make another one.
Let's make another one.
Maybe our other tree, maybe we'll have one right there.
And we start out the same way, just make a little, little line.
And, back and forth, back and forth.
Just sort of let that rascal come right out of that brush.
It lives in there.
He lives in there.
Old tree.
Now sometimes they'll hide in there, you have to sort of force them out.
But isn't that a fantastic way of making some very beautiful evergreens?
Now, shoot, you know me.
I think everybody needs a friend.
So we're going to give him one right here.
Right there.
There, see, there he comes.
And we're not concerned in this area.
That's all so dark, we'll separate all that with highlights, all that with highlights.
Let's take a little bit of that color we had for our trunk, and we'll just touch with the knife.
And just once again, we're not going to see much of it.
All we want to do here, is just show a little, just here and there.
Just wherever you think it should show.
Like that.
Let me wash the old oval brush out here.
Let's have some fun with some highlight colors.
Okay now then for highlights I'm going to take a little of that tree color and mix it with the cad yellow and the yellow ochre and a little Indian yellow.
But mix all these colors on the brush so you have a multitude of things happening on the brush.
You don't end up with one dead old color.
Alright, now then think about your light.
It's coming from the right.
Now we can go up in here and just begin putting in the indication of some beautiful highlights that live right here on this tree.
See them?
There they are.
There.
Let's just put some in.
But this is where you make all those old hangy down limbs and we're going straight in with the brush, straight in.
And just touching.
Just touching, letting those top part of the bristles, just the top part of the bristles touch.
There, see there?
Now then, let's go over on the other side here.
And do the same thing for him.
If we left him out, shoot he'd probably be angry.
Probably be angry.
And we don't want that, we want happy trees in our paintings.
[chuckles] I get some letters some times, people say everything in your world is happy.
And that's true.
We try to keep everything happy in here.
Shoot, if you want bad stuff, watch the news.
In this world, we only have pleasant things.
There.
Now then, sometimes it's fun.
I'll just dip this into a little bit of the liquid clear.
And I want a real thin color, much lighter, but I use the clear to thin it.
And then it'll, it's very thin paint now.
And you can go back up here and pick out where you think light would really zing through here.
And just put on a few sparklers.
Don't over do this.
Don't over do.
Because it gets good.
Just here and there.
But that clear thins the paint.
If you've painted with me before you know our golden rule here is a thin paint will stick to a thick paint.
We use a very firm paint until we get to the highlights.
And maybe just a few over in here, I don't want too many on this tree.
Just a few, there.
Alright, we're alright there.
Let's have some fun.
Now we have a transparent color here.
This was sap green and a little bit of Van Dyke brown, just to dull it.
I'm going to take pure white, just titanium white on the two inch brush.
You have to make a big decision, where is your water?
I want some water in here.
Touch this and pull it straight down.
It's important that it comes straight down.
And that sap green and Van Dyke brown, they'll make some beautiful, beautiful colors.
And it's fun to prepare this canvas when nobody's looking and when you do this, especially if you're painting for someone, they think it's magic.
Now we go straight across and that'll create the illusion of water.
That easy.
I'm going to take a one inch brush, put a little liquid white on it and go right through some of that color.
Just a nice green color.
And let's back in here, put the indication of just a happy little bush or two that lives right here, right on the edge of the water.
Something like that.
A little Van Dyke brown, a little dark sienna mixed together and we can put the indication of some land back in there.
See there?
That easy.
A little bit of brown and white, put a little highlight on it.
Shoot, we're in business.
A little bit more of that color.
Maybe there's a [Bob makes "shoo" sound], lookie there.
A little bank lives out here too, see, just sort of let that go, barely, barely touching though.
And a little bit on the other side.
See, we can put another bank over here.
In your world, you make these decisions, decide where all these little things live.
Take a little touch of the liquid white on the knife and we'll just cut in a little water line.
And this separates, just separates.
It's just straight liquid white.
A few little ripples here and there.
Shoot we about have a finished painting.
I think that, I think we'll call that one done.
But this is a good example of how easy this technique is.
So I look forward to seeing you in the next show.
And until then, happy painting, God bless my friend.


Support for PBS provided by:
Distributed nationally by American Public Television